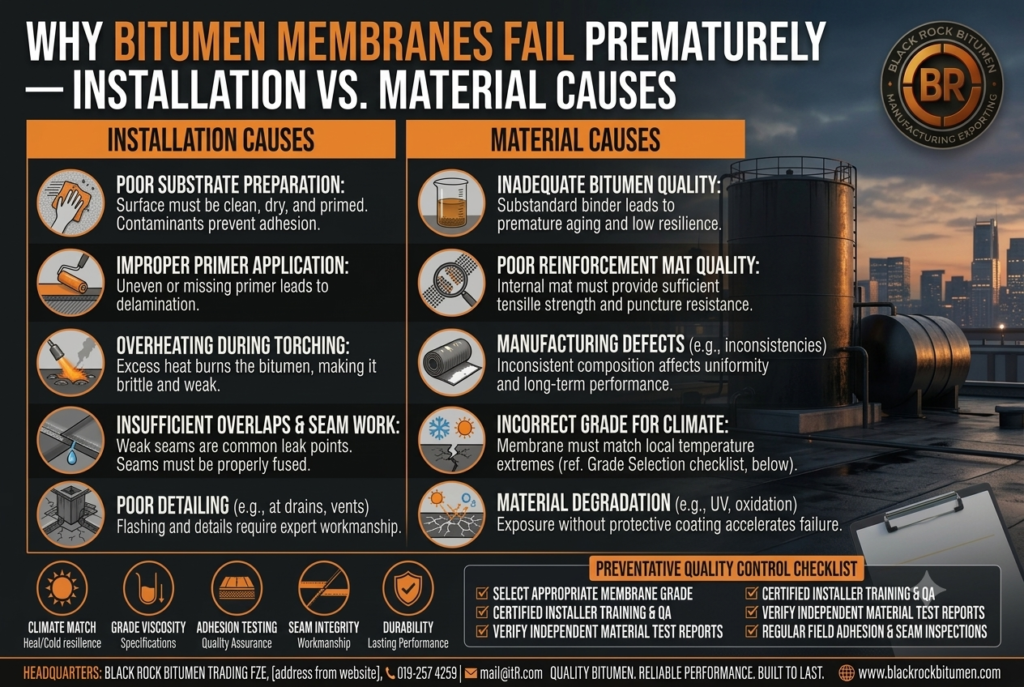
Bitumen membranes rarely fail for one simple reason. A blister, open lap, crack, or leak can look like a material problem when the real cause is an unprepared substrate, trapped moisture, poor detailing, overheating during torch application, or movement that the system was never designed to accommodate. The reverse is also true: a membrane can be installed carefully and still underperform if the sheet, reinforcement, modifier, or batch quality is wrong.
That is why the most useful way to investigate premature membrane failure is to separate the problem into three buckets: installation, material, and system/design.
A failure concentrated around one corner, seam, drain, or lap often points toward installation or detailing. A defect that appears repeatedly across rolls from the same batch is more reason to investigate the material itself. And when the membrane fails consistently across an entire structure despite good workmanship, the system design deserves a closer look.
For buyers sourcing waterproofing materials across Africa, South America, and Southeast Asia, that distinction matters because a membrane replacement is rarely just a material cost. It can mean removing finishes, reopening protected areas, delaying handover, and repeating labour-intensive installation. The better approach is to identify the failure mechanism before replacing the product.
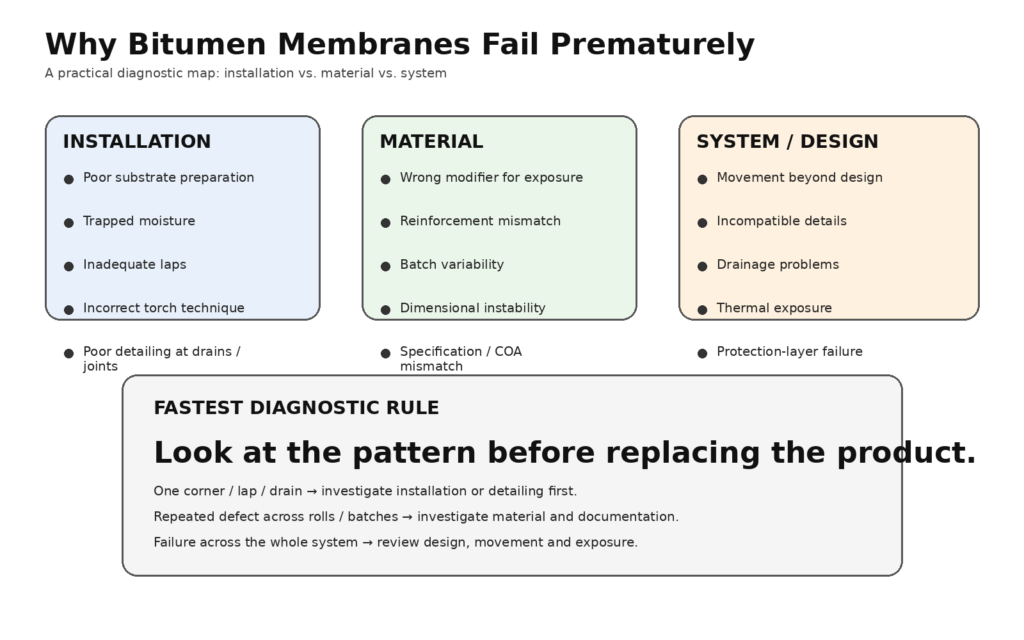
Alt text: Diagnostic infographic showing three common bitumen membrane failure categories — installation, material, and system/design — with examples such as poor substrate preparation, inadequate laps, batch variability, modifier mismatch, movement, and incompatible details.
The Three Causes Behind Most Premature Membrane Failures
The first mistake is treating every leak as proof that the membrane itself was defective. Waterproofing is a system, and the sheet is only one part of it. Concrete condition, primer, adhesive or torch application, laps, penetrations, drainage, protection layers, movement joints, and the surrounding construction all affect the final result.
ASTM D5295/D5295M-18 specifically addresses preparation of concrete surfaces before adhered waterproofing and notes that surface type, smoothness, cleanliness, contaminants, and moisture can affect the initial bond. ASTM D5295/D5295M-18.
| Failure sign | Installation cause to check | Material cause to check | Useful investigation |
| Blisters / bubbles | Trapped moisture, poor venting, overheated substrate | Poorly controlled compound or inadequate dimensional stability | Moisture testing, visual mapping, adhesion checks |
| Open laps | Insufficient heat/pressure or inadequate overlap | Poor lap compatibility or unstable compound | Lap inspection, peel/lap-shear testing |
| Cracking | Movement, poor detailing, substrate cracks transferred into membrane | Modifier/reinforcement mismatch or low-temperature weakness | Crack mapping, membrane identification, flexibility testing |
| Debonding | Dust, laitance, contamination, damp concrete | Adhesion/compound issue or incompatible primer | ASTM D5295 review, peel adhesion testing |
| Softening / flow | Excessive torch heat or unsuitable exposure detail | Inadequate high-temperature resistance | Temperature history, product specification, batch COA |
| Wrinkles / distortion | Poor laying technique or substrate irregularities | Dimensional instability | Roll/batch comparison, dimensional checks |
| Leaks at penetrations | Poor detailing around drains, pipes, joints or corners | Membrane not suited to the movement/detail | Water test, detail inspection, system-design review |
1. Substrate Preparation: The Failure Often Starts Below the Membrane
A membrane can only bond as well as the surface beneath it allows. Concrete laitance, dust, curing compounds, oil, loose particles, sharp projections, and poorly repaired cracks can all create weak points. ASTM D5295/D5295M-18 covers preparation of concrete for adhered waterproofing and addresses surface defects, cleaning, contaminants, and moisture evaluation.
Moisture is especially important. If water vapour is trapped below an adhered membrane and later warms, the pressure can contribute to blistering or debonding. ASTM F2170 provides an in-situ relative-humidity method for concrete slabs; it is a measurement method, not a universal pass/fail limit, because the acceptable moisture condition depends on the membrane system and manufacturer. ASTM F2170.
Do not take a generic moisture number from a different waterproofing system and treat it as universal. The project specification and membrane manufacturer’s installation requirements should determine the acceptance limit.
• Check that the substrate is clean, sound, and free of contaminants before priming.
• Measure moisture rather than judging a slab by touch alone.
• Repair cracks, honeycombing, voids, and sharp projections before membrane placement.
• Confirm primer compatibility and coverage where the system requires one.
2. Lap Joints: Small Dimensions, Big Consequences
A membrane sheet is only as continuous as its weakest joint. Open or poorly bonded laps are among the easiest places for water to find a path, particularly when the membrane is exposed to thermal cycling or hydrostatic pressure.
Typical installation practice may use side laps in the region of 75–100 mm and end laps around 150 mm, but these are not universal values. The manufacturer’s instructions and the governing project specification should always control.
ASTM D5898/D5898M-96(2021) provides standard details for adhered sheet waterproofing, including typical below-grade and plaza conditions. ASTM D5898/D5898M-96(2021).
3. SBS vs. APP: The Modifier Changes How the Membrane Behaves
SBS and APP membranes are both modified bituminous sheets, but they do not behave identically. SBS is an elastomeric modifier, so the membrane is generally valued for flexibility, elongation, and crack-bridging behaviour. APP is a plastomeric modifier and is commonly selected where high-temperature and UV exposure are major considerations.
ASTM’s roofing standards separate SBS sheet specifications by reinforcement type — including D6162, D6163, and D6164 — while APP sheets are covered by separate specifications such as D6222 and D6223. ASTM D6162/D6162M-21, ASTM D6163/D6163M, ASTM D6164/D6164M-21 and ASTM roofing standards.
If a membrane cracks because the system cannot accommodate movement, the investigation should ask whether the modifier and reinforcement were appropriate for the service conditions. If a membrane softens or distorts in severe heat, the product specification and temperature exposure need to be checked before blaming installation.
| Characteristic | SBS membrane | APP membrane | Why it matters |
| Modifier type | Elastomeric | Plastomeric | Changes flexibility and temperature response |
| Typical strength | Flexibility and elongation | Heat/UV resistance | Selection should match exposure and movement |
| Cold-weather behaviour | Generally strong flexibility | More formulation-dependent | Important where night/seasonal temperatures drop |
| Common application | Torch, hot-mopped, self-adhered systems | Commonly torch-applied systems | Application method must match the membrane |
| Failure question | Was movement or flexibility demand too high? | Was heat exposure or system design too demanding? | Helps narrow the investigation |
4. Torch Application: Too Little Heat and Too Much Heat Can Both Cause Trouble
Torch-applied membranes depend on controlled heating. Too little heat can leave the underside insufficiently bonded; too much heat can damage the compound, distort the sheet, overheat the substrate, or create a fire hazard. The target is controlled activation of the membrane system — not simply making the roll as hot as possible.
This is also why the installation method needs to be treated as part of the product specification. A membrane designed for torch application should not be handled as though it were a generic bitumen sheet, and site crews need the manufacturer’s temperature and application instructions rather than an assumed torch setting.
• Keep open flame away from combustible materials and vulnerable construction details.
• Use the membrane manufacturer’s torch technique and heating guidance.
• Watch for scorching, excessive flow, smoke, or distortion as signs of overheating.
• Treat penetrations, corners, drains, and vertical transitions as separate detailing tasks.
5. Standards Matter: You Cannot Specify a Membrane by ‘Bitumen Membrane’ Alone
A buyer needs to know what the sheet is, how it is reinforced, where it is intended to be used, and which performance requirements it meets. For SBS products, ASTM D6162, D6163 and D6164 cover different reinforcement configurations. ASTM’s current roofing standards listing also identifies APP sheet specifications including D6222/D6223.
European projects may use EN product standards such as EN 13707 for reinforced bitumen sheets for roof waterproofing, EN 13969 for bitumen damp-proof sheets, and EN 14695 for reinforced bitumen sheets used for waterproofing concrete bridge decks. The governing standard should be stated in the purchase specification instead of leaving the supplier to infer it.
That also prevents a common procurement mistake: comparing two products that look similar on paper but are tested against different requirements. A membrane’s thickness alone does not establish that it is suitable for a roof, basement, podium, tunnel, or bridge deck.
6. When Is the Material Actually the Problem?
Material failure should be investigated when the evidence points beyond workmanship. Look for patterns rather than isolated defects. If every roll installed by one crew has the same open-lap problem, installation is an obvious suspect. If one batch shows repeated soft spots, unusual distortion, inconsistent reinforcement, or results outside the agreed specification, the material deserves closer attention.
This is where the paperwork becomes useful. A TDS tells you what the product is designed to meet; a batch-specific COA tells you what was actually tested. The distinction is explained in Black Rock Bitumen’s How to Read a Bitumen Technical Data Sheet (TDS), and the same principle applies to membrane procurement.
• Check the product name, grade, reinforcement, thickness, roll dimensions, and governing standard.
• Compare the batch COA against the agreed specification rather than relying on a generic TDS.
• Record roll or batch numbers so failures can be traced back to the supplied material.
• Retain samples and photographs where a material dispute is possible.
• Use an independent or appropriately accredited laboratory when the dispute is significant.
7. How to Investigate a Failed Membrane Before Replacing It
1. Map the failure. Photograph and mark every leak, blister, crack, open lap, and debonded area.
2. Look for patterns. Concentration at corners, laps, penetrations, or one installation area often points toward workmanship or detailing.
3. Check the substrate history. Confirm concrete preparation, curing, moisture testing, primer use, and repairs.
4. Identify the membrane. Record manufacturer, product family, modifier type, reinforcement, thickness, roll number, and batch.
5. Review installation conditions. Check weather, torch application, adhesive use, overlap dimensions, and protection during construction.
6. Inspect the surrounding system. Drains, joints, terminations, flashing, protection boards, and movement details can all create water paths.
7. Test where necessary. Peel adhesion and lap-shear testing can help assess whether a debonded or failed joint has retained adequate bond strength.
8. Compare the evidence. Decide whether the dominant cause is installation, material, system design, or a combination of them.
The Pattern Test: One of the Fastest Ways to Narrow the Cause
One of the most useful rules in membrane troubleshooting is simple: look at the pattern before looking at the product.
If a failure is concentrated around one corner, drain, penetration, or lap, investigate the installation and detail first. If the same defect repeats across many rolls or across separate installation teams, the probability of a material or specification issue rises. Neither pattern proves the cause on its own, but it tells you where to spend the next hour of investigation.
That approach is especially valuable for international projects because replacing a full membrane system based on an unverified assumption can create a second failure while the original cause remains untouched.
Where Black Rock Bitumen Fits Into the Procurement Process
Black Rock Bitumen supplies bitumen-based waterproofing membrane systems for roofs, basements, foundations, tunnels, bridge decks, and other infrastructure applications, including APP and SBS modified membranes. Waterproof Membrane range The company is Dubai-based and supplies projects across Africa, Asia, and the Middle East, making documentation and product traceability particularly important when material crosses borders.
For membrane buyers, the practical question should not stop at price per roll. Ask for the product specification, governing standard, technical data, batch documentation, roll identification, installation guidance, and the details of the proposed system. If you are sourcing the membrane base material as well, Black Rock Bitumen also supplies oxidized grades used in membrane manufacturing, including grades such as 75/25 and 105/35 for different performance requirements. Oxidized Bitumen 75/25 Oxidized Bitumen 105/35.
FAQs
Why do bitumen membranes blister?
Blistering can result from trapped moisture or vapour, inadequate adhesion, poor substrate preparation, or installation conditions. The pattern and substrate history should be checked before blaming the membrane.
What causes bitumen membrane laps to open?
Common causes include insufficient overlap, inadequate heating or pressure during installation, contamination, poor detailing, or incompatibility within the membrane system. Check the specified lap dimensions and installation method.
Is SBS or APP better for waterproofing?
Neither is universally better. SBS is generally chosen where flexibility and movement accommodation are important, while APP is commonly selected where high-temperature and UV exposure are major considerations. The correct choice depends on the system and service conditions.
How can I tell whether a membrane failure is a material defect?
Look for repeated defects across rolls or batches, compare the material against its specification and COA, and use appropriate laboratory or adhesion testing when the evidence warrants it.
What should I check before buying a bitumen membrane?
Confirm the membrane type, modifier, reinforcement, thickness, dimensions, governing standard, intended application, batch documentation, installation method, and compatibility with the substrate and project details.
The Bottom Line
Premature bitumen membrane failure is rarely solved by simply buying a thicker or more expensive sheet. The better answer is diagnosis. Check the substrate, moisture, laps, application method, modifier, reinforcement, batch documentation, and system details before deciding what failed.
For buyers, the safest specification is one that defines the product and the system together: governing standard, membrane type, reinforcement, dimensions, performance requirements, installation method, and documentation. That makes it much easier to distinguish an installation problem from a genuine material issue.
If you are sourcing waterproofing materials for a project in Africa, South America, or Southeast Asia, Black Rock Bitumen’s Waterproof Membrane range can be reviewed alongside the technical requirements for the project. For projects using bitumen as a membrane manufacturing feedstock, its oxidized bitumen grades provide another procurement route. The goal is the same in both cases: match the material, specification, and installation system before the first roll reaches the site.